The Stencil1 crew stenciled 99 rooms in a new NYC Boutique hotel and in this video Dolinda Meeker (aka DeLo) and I  paint the last of the 99 rooms to show you just how we did it! We custom designed three designs – dancing girls, a blues singer, and a taxi in motion- all over 8 feet tall!  Hope you enjoy it!

YouTube Preview Image


Looking for a way to liven up your bedding without having to go shopping? Look at what you can do with set of solid-color sheets and stencils from Stencil1. We used our Headphones stencil on the pillows cases and coupled it with the Graffiti Mini Set #1 on the flat sheet.

It’s the perfect weekend project for you, you and your sweetie,  or the whole family.

The stencils are available individually at www.stencil1.com or some such as the headphones are one of 25 designs in our book Stencil101. Stencil Style 101 also has designs that are great for sprucing up apparel and home decor!

Here’s what you need and how to do it:

Materials: pillowcase, stencil, fabric paint, stencil brush, painter’s tape or spray adhesive, iron, cardboard or shirt box.

1. Choose your pillowcase: You can use a cotton standard bed pillowcase or a canvas throw pillow case for this project.

2. Prep the pillowcase: Insert a sheet of cardboard into the case to stretch the pillowcase flat and provide a flat surface to stencil on.

3. Position your stencil: You may wish to hold the stencil in place with a low tack spray adhesive or painters tape.

4. Begin painting: Using fabric paint and stencil brush, carefully paint in the stencil open areas using a pouncing motion. It’s best to use a non-toxic fabric paint rather than experimenting with spray paint or other paints given that you’ll be sleeping on it. Once completed, lift the stencil to see your design.

5. Finishing: Heat seal the painted design by using a hairdryer for 2 minutes then ironing the pillowcase inside out.


If you are in the Bay Area, tune into View from the Bay at 3pm today on Channel 7 ABC News. I was honored to tape a segment with energetic host Lisa Quinn in her stunning home. I  showed Lisa how to make t-shirts and more using the stencils from our book.  Not in the Bay area? Well, they also stream the show live on their website here.  Hope you like it!

bridge


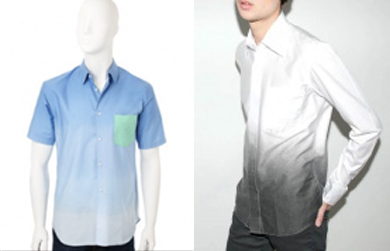
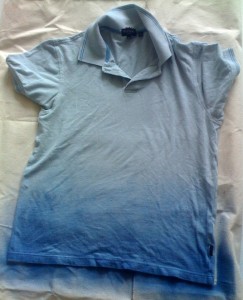
So I have been seeing a lot of these gradient dyed shirts around lately, many which are NOT CHEAP. I like them but I always keep thinking, I could do that! I thought, ok, I’ll dip a shirt in dye but them I thought there is a more controlled way to do this. I used my Stencil1 Sprayers to really get that gradual change in color from dark to light! So I laid down this shirt that is light blue with dark trim. I decided to keep it simple and make the gradient blue as well. Starting at the bottom, I sprayed all along the bottom several layers, then moved upward doing a little less, then up more and even less,etc…Once it dries I will heat seal it with an iron and have a new summer shirt!

The gradient trend

The gradient trend

My Stencil1 sprayer gradient shirt!

My Stencil1 sprayer gradient shirt!