Here’s a fun how to video where I show you how to create a cohesive framed art collage. What’s fun is you can customize the how-to using your favorite photos and favorite paint colors!

The ingredients you will need are:

Spray paint. In this case Krylon Indoor/Outdoor spray paint.

• Picture frames. In this case I used some Ikea picture frames. you can use vintage ones as well.

• Artwork. In addition to images I collected or cut out from books, i created a print using my anchor stencil and Stencil1 Spray Inks. I encourage you to make your own prints!

• Paper to work on.

• Hammer, nails, & a ruler to hang the art

YouTube Preview Image

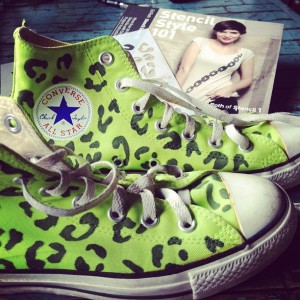
Using our leopard stencil in Stencil Style 101, a Stained by Sharpie marker and a pair of Converse sneakers, you too can see spots. Chapter 4 of the book shows you how and provides you the leopard stencil in addition to over 20 other stencils! Get the book here>


The other night was a little DIY-craft evening for Stencil1. Steve Madden had invited Ed to vamp up their Bdagmar cross-body satchel for a promo giveaway. We went to Vine Wine for a little refreshment (and in addition to our bottle of rose got these great Govino plastic wine glasses that are perfect for the studio). With the banana yellow canvas, Ed had so many stencil styles that would work. Go with a repeat pattern? An iconic image? Ed chose the EVOLVE design by Clark Clark, featured in his forthcoming Stencil Style 101, along with the repeat pattern rainbows. Of it Ed says, “I wanted to feature a guest artist in this project and chose Clark Clark, who is also a political activist. He designed the VOTE stencil for Obama’s 2008 presidential campaign and designed the EVOLVE stencil, which is very cool in my opinion. Here’s what Clark Clark said about it:

‘Evolve is a one-word manifesto for my art. I never want to be stagnant, so my art is constantly evolving and adapting to my surroundings, whether it be the community in which I live or the news of the day. Evolution is about diversity, and I am always working on a variety of projects at any given time. My art is also about adapting other artists’ ideas, evolving their work to make it my own. It is in itself an evolution of Robert Indiana’s art. Evolve is a call to action to those who read it—a reminder to never become stuck or too set in their ways.'”

We like the idea of transmitting such an important message on something as ubiquitous as a handbag via something as simple as a stencil. It’s an election year, let’s all think more.


Ed, thanks for the gracious welcome. Talking to you and Betsy was fab, as usual. Thank you for letting me run on at the mouth AND blog for Stencil1. To kick things off, here’s a quick and dirty stencil project I did with my officemate E.

Unlike some unfortunate souls, my day job is pretty sweet. The hours are long and we work hard, but creativity is encouraged and our downtime is our own. Last week, E and I found some notebooks heading for the trash and rescued them with a little TSP — Tape, Stencil, Paint. Why waste when you can resuscitate?

We chose stencil designs from Ed’s newest book, Stencil 201, which contains 25 reusable stencils and rad project ideas that go way beyond paint. In minutes, we had inspiring vessels in which to log our hopes, dreams, and creative sparks. And we killed some time we’d otherwise be watching the clock.

Notebooks

What you need: Notebook, low-tack tape, acrylic craft paint or Stencil1 Sprayers*, paper plate or scrap paper, stencil brush, soap and water for brush clean-up

Note: Stenciling is a dry brush technique. When applying paint, remember the rule: Less Now. More Later.

1. Tape the stencil where you want your design to appear. Squirt out a dollop of acrylic craft paint onto paper plate.

2. Dip your stencil brush in the paint, picking up a small amount of color, then dab brush to remove any globs. You want just enough to fill in a small area of the stencil without squirting paint underneath.

3. With an up and down “pouncing” motion, dab the paint onto the surface, filling in a small open area of the stencil. (Less Now.)

4. Repeat steps 2 and 3 until the image is filled. Allow to dry and do a second or even a third coat, depending on the intensity of color you want. (More Later.)

5. After a minute or so of drying, remove the stencil and admire your new dreamcatcher.

*This project works great with markers and colored pencils too.

Photo by Brian Haskell


Diego Rivera and Frida Kahlo. Charles and Ray Eames. Bjork and Matthew Barney. Synergistic unions resulting in creative genius. And now Stencil1 stencils meet Stained by Sharpie Fabric Markers!  I am so happy that Sharpie has released these fabric markers, they are ideal for t-shirt making as well as customizing all sorts of other apparel. I brought these new markers to the book launch party for my new book Stencil 201 so that attendees could make something. I cut up some canvas into patches and let the crowd loose! Check out the video, I think you’ll see people had such a fun time with the stencils and the new markers! Thanks Sharpie for making this event such an ease!

Music by VideoHelper.


YouTube Preview Image

One thing I have learned in working for myself and creating my own company is to not think you can do it all. Learning to trust other creatives with your “baby” is a very important thing. This new stop motion video by Little Aaron and Friends just way exceeded my expectations. This team of animators created such a fun piece to simply demonstrate what’s in Stencil 201 and what can you do with it. I love the style, art student meets DIY – what could be more fitting for Stencil1! I hope you enjoy the video. Thanks Little Aaron & Friends!