11

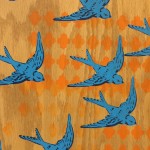
Day of the Dead is approaching, why not make some beautiful watercolor cards for the occasion? We used a Crayola watercolor paint set, watercolor paper cards, and our Stencil1 sugar skull stencil. Here’s how we did it:

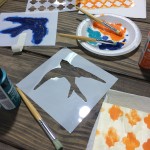
Lay out all your materials. Be sure to use watercolor paint and watercolor paper.

1

Using some low tack spray adhesive, we positioned the sugar skull stencil on the card. Only use a little spray and let it dry 60 seconds before laying it on the card.

2

We wanted the sugar skull design to be colorful so we used many colors in the watercolor set. Choose a color and start by dipping your brush in water. You then activate a color by swirling the wet brush in the dry paint. For stenciling, we recommend you get the paint a little thick by swirling a bit and then dab the brush on a paper towel. Too wet an application may make the watercolor paint need too much.

3

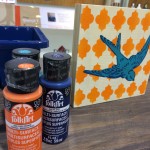
Apply your first color, we made all heart shapes red to start.

5

Some blue teeth…

6

Some park purple outlines…

7

Ready to reveal!

8

Here it is!

9

Please post your creations using #stencil1 and @stencil1

10


Cork boards are awesome because they can be great functional pieces of art. They take on paint really well and serve as a great surface to pin your daily reminders on. Not only will you be on top of everything you have to do, but your office will also look great!

To make this pin board, you’ll need: 4 8 ½” by 11” cork sheets, multi-surface paint, brushes, double sided mounting tape and our cherry branch 11 x 11 stencil.

Step 1: Lay out your four cork sheets side by side so that they form a square. Place your stencil on the top right corner of your square. Angle it so that it looks as if your branch is part of a big cherry blossom tree.

Stencil1_BlossomBoard_01

Stencil1_BlossomBoard_01b

Step 2: Using brown paint and a stencil brush, begin to paint in the branch. Make sure to use a dry brush technique, this means that you are using a very small amount of paint and applying several layers to make the color more saturated. Use an up and down dabbing motion to paint.

Stencil1_BlossomBoard_02

Step 3: Rinse your brush, or use a different brush to paint your petals white. If you are re-using your previous brush, make sure you dry it really well. Again, use very little paint and an up and down dabbing motion.

Stencil1_BlossomBoard_03

Step 4: We love the colors of cherry blossoms. To simulate that look, we used a dab of pink paint (paint your plate a little bit to get the excess paint off your brush) to tint parts of the petals a pastel pink.

Stencil1_BlossomBoard_04

Stencil1_BlossomBoard_05

Stencil1_BlossomBoard_06

Step 5: Use the stencil at different angles to paint some flowers and petals falling off the branch.

Stencil1_BlossomBoard_07

Stencil1_BlossomBoard_08

Step 6: Once your paint is dry, put a piece of double-sided mounting tape of the back of your cork sheets. Hang them up arranged like you painted them, but allow them to separate a little bit from each other.  Snap a picture of your pin board and show us what it looks like in your home or office! @stencil1

Stencil1_BlossomBoard_09

Stencil1_BlossomBoard_10 Stencil1_BlossomBoard_11


Individual clear stamps, also known as acrylic stamps, are easy to use and similar to rubber stamps. To use, simply peel off stamp from it’s backing, attach it to a clear stamp block and stamp away! These stamps are perfect for layering and for creating fun and graphic designs.


toppic_stencil1

One year ago, I began chatting with Plaid Enterprises about licensing my designs to create a line together. Well, cut to January 2014 and I am psyched to announce my new Stencil1 Plaid-FolkArt stencil line!  These new designs are so bold and graphic, and many are designed as multi-layered. I demo’d this process in my booth at CHA (Craft and Hobby Association tradeshow). Oh my booth that the Plaid peeps totally customized Stencil1 style – built a reclaimed wood and plumbers pipe table, hand jig-sawed some Stencil1 patterns and birds for more DIY décor, my booth just stated what I am all about- old meets new, industrial chic.

So,  I met the greatest people all day and it seemed to me that everyone really enjoyed the layering process. Here’s some pics of the happy crafters:


I shared the Plaid booth with the amazing Cathie & Steve and their new Mod Podge products. They introduced the world to the deco den trend and scored some design awards for their MOD MELTER. Inspiring!

Also to my side, was Candie Cooper, showing the gals how to make some on-point jewelry. Look at this pic I took of Candie’s handmade talents:

Then, Pinterest genius and ball of energy Rachel Faucett of HANDMADE CHARLOTTE was demo’ing her new stencil line on silk scarves. This release she focused on world culture influence, pattern, beautiful stuff! She also has these cutesy wood stitchables I need to get my hands on. Oh and some highly usable sticky backed stencils for stenciling rounded surfaces like glasses, clay pots, and other not so flat surfaces!

Rachel


I was visited my NY gal Erica Domesek of PS I Made This and we reminisced. Also got a hug from the genuine, and ever knit-savy Vickie Howell. I wish I had a pic of her loose yarn necklace, I’ll bug her for a shot of it.

I met store buyers, shop owners, crafters, locals, and travelers and had such a great time hearing each person’s connection to the industry.  Some even called me Big Daddy, those in the know of the legendary Ed “Big Daddy” Roth.  At night, I got to see some good old friends of whom have supported me for years including craft wife Jaderbomb and ever generous and supportive Jen Perkins as well as meeting new one’s – artists, crafters, business owners, and bloggers – all so excited to talk shop. We are all so fortunate to work in a creative field!

CHA was such a success and you will soon see the line out in major art and craft supply stores as well as on Stencil1.com   To think of my designs reaching more people is very humbling, I hope you enjoy !


This past Friday was the start of the Chinese New Year. We celebrated at Stencil1 by making this gorgeous piece of art on hand made paper. We layered our stallion stencil over our scallop pattern stencil—part of our new Stencil1 stencil line with Plaid! This layering technique creates a beautifully intricate and festive look.

For this piece you’ll need: stencil brushes, scallop pattern stencil, stallion stencil, multi-surface paint and hand-made paper.

Step 1: To start, we mapped out where we wanted to stencil the pattern on the paper. We used hand-made paper because it went with our Chinese New Year theme. But you can make this on any surface—a shirt, pillow, canvas, cardboard etc! We decided to cover the paper with the scallop pattern fully except for a border around the edges.

Stencil1_YearofHorse_01

Step 2: Next, you can begin stenciling! Stencil using a dry brush technique, this means using very little paint and applying multiple layers. If you are stenciling on paper, you have to be extra careful not to use too much paint. Start extremely light and add on as needed. We used yellow, red and a metallic copper to get an umber look.  To do this, we used three different brushes to paint different sections of the design. Try to blend your colors and don’t be afraid to overlap.

Stencil1_YearofHorse_02

Step 3: Let that first section dry and move the pattern on to the next section. Use the part you already painted to align the stencil. Repeat this step until you’ve fully stenciled the paper.

Stencil1_YearofHorse_03

Stencil1_YearofHorse_04

Stencil1_YearofHorse_05

Stencil1_YearofHorse_06

Stencil1_YearofHorse_07

Step 4: Once your paint is dry, you can stencil the horse.  We used black because it resembles the black ink used in Chinese art.  Place the stallion stencil centered on the paper. And use a brush to paint it in. Remember to use very little paint. Use a circular motion to cover the larger areas and an up and down dabbing motion to cover the more detailed areas.  Apply as many layers as need to achieve the color you want.

Stencil1_YearofHorse_08

Stencil1_YearofHorse_09

Stencil1_YearofHorse_10

Stencil1_YearofHorse_11

Stencil1_YearofHorse_12

Step 5: Allow your paint to fully dry and then frame your art! Place it somewhere in your home or office and send us a picture of your work @stencil1

Stencil1_YearofHorse_13


Whether you have a significant other or just love yourself, why not tote around the good vibes? This easy how-to will show you how easy it is to custom stencil a tote bag using our HEARTS 4-pack stencil, some multi-surface paint, and a stencil brush on a basic cotton tote.

Heart_tote_Stencil1_1

FIrst thing you want to do is insert a piece of cardboard into the tote. This way your paint won’t bleed through to the back of the bag and it will provide you a flat surface to stencil on.Heart_tote_Stencil1_2

Now place your stencil where you’d like your design to appear.

.Heart_tote_Stencil1_3

Time to whip our the fabric paint!

Heart_tote_Stencil1_4

Stenciling is a dry-brush technique.  Always remove excess paint from your brush before you paint in the design.

Heart_tote_Stencil1_5

I usually fill in my designs completely and evenly but I wanted these hearts to look airbrushed with a little dimension. The way you achieve this effect is by working from the edges inward in a swirling motion. As the brush gets less paint on it, you then lightly paint in the center.

Heart_tote_Stencil1_6

See 🙂

Heart_tote_Stencil1_7

Repeat the process. I switched colors but I did not wash my brush or my stencil as I wanted to blend colors. That’s up to you!

Heart_tote_Stencil1_8


And again!

Heart_tote_Stencil1_8b

I did this four times, sort of a motion to the hearts…

Heart_tote_Stencil1_9

Once the design dries, heat seal with an iron for 30-60 seconds per area.

Heart_tote_Stencil1_10

Tote your happy hearts around like my friend Libby did, spreading a little love in the NYC subway!

IMG_1898