
To make these stencil graffiti pumpkins, you’ll need:
Spray paint
pumpkins
To make these stencil graffiti pumpkins, you’ll need:
Spray paint
pumpkins
I love finding unique objects while walking around, especially if I can turn them into awesome key holders, which is what we did with this piece of wood I found in front of a Brooklyn warehouse! Here are all the supplies we used- the Stencil1 Skeleton Keys 8-pack stencil, paint, tape, hooks, paper towels, hammer & nails, and images you want to paste on.


We wanted to go for a vintage/Paris theme so we stenciled the wood with acrylic paint with a ombré effect and decoupaged some beautiful images that fit our theme. To create the ombré effect paint the top half of the key with any color (we used a nice bright turquoise) and then use white to paint the bottom half of the key, merging both colors in the middle. Use tape to secure your stencil while painting. We painted three keys but you could have fun with the design. You could even try overlapping keys!

Next, cut out the images you want to paste onto the wood. Use a brush to apply the Paper Mod Podge to the back of the images. Apply it to the wood by lightly pressing down the image onto the surface. Once dry, coat the front of the image with Mod Podge as well.


Once the paint and Mod Podge is dry, decided where you want to place your hooks and screw them in. Make a small hole with a nail and hammer can make this step a little easier. Lastly, attach a hanger to the back of the wood so you can place the key holder on the wall. Now you have you own awesome custom key holder! Wahoo! Share pictures of what you make with us @stencil1


I was walking by a tall apartment building in NYC and there it was, a discarded avocado colored wood lamp. Solid wood! I carried it home on the train and got busy on this make-over!

First, I sanded down the surface to make it more receptive to paint. I dusted it off too.

Then I choose a light neutral colored paint as my base, a cream. I love it, it already looks happier.

Then I wanted to do something modern, on-trend but also folky so I choose some arrow stencils from the Stencil1 CAMP stencil set and another arrow in Stencil Style 101. I taped off areas to isolate the arrows. I then choose two colors, red and blue for my arrows.

I did a stencil test of my arrows on a piece of scrap wood.

I then stenciled arrows in various positions, all “shooting” upwards! I think it’s more positive in that direction! I used a very dry brush technique to give it a super handmade, folky look to it. Sort of modern folk, no? Anyway, I covered the entire lamp in hundreds of arrows and splurged and bought a new shade for this found treasure!


And there it is, to brighten my day!
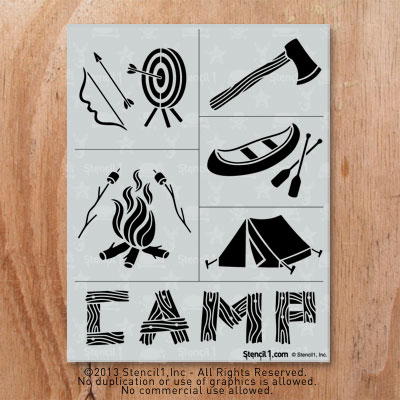

Recently I did a workshop at Unique Camp. This trip inspired me on many levels, from new business goals to this new stencil design. This 6-pack Camp Stencil set includes a bow and arrow with target, campfire and roasting marshmallows, an ax, a canoe and paddle, a tent and wood-style camp letters. Use these stencils to give a journal an outdoorsy look or to customize t-shirts and maybe even your tent! Here are some images of things we made to inspire you! Show us what you make by tagging Stencil1!


