Whether you have a significant other or just love yourself, why not tote around the good vibes? This easy how-to will show you how easy it is to custom stencil a tote bag using our HEARTS 4-pack stencil, some multi-surface paint, and a stencil brush on a basic cotton tote.

Heart_tote_Stencil1_1

FIrst thing you want to do is insert a piece of cardboard into the tote. This way your paint won’t bleed through to the back of the bag and it will provide you a flat surface to stencil on.Heart_tote_Stencil1_2

Now place your stencil where you’d like your design to appear.

.Heart_tote_Stencil1_3

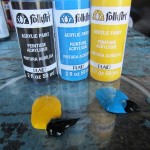
Time to whip our the fabric paint!

Heart_tote_Stencil1_4

Stenciling is a dry-brush technique.  Always remove excess paint from your brush before you paint in the design.

Heart_tote_Stencil1_5

I usually fill in my designs completely and evenly but I wanted these hearts to look airbrushed with a little dimension. The way you achieve this effect is by working from the edges inward in a swirling motion. As the brush gets less paint on it, you then lightly paint in the center.

Heart_tote_Stencil1_6

See 🙂

Heart_tote_Stencil1_7

Repeat the process. I switched colors but I did not wash my brush or my stencil as I wanted to blend colors. That’s up to you!

Heart_tote_Stencil1_8


And again!

Heart_tote_Stencil1_8b

I did this four times, sort of a motion to the hearts…

Heart_tote_Stencil1_9

Once the design dries, heat seal with an iron for 30-60 seconds per area.

Heart_tote_Stencil1_10

Tote your happy hearts around like my friend Libby did, spreading a little love in the NYC subway!

IMG_1898


One of my favorite techniques is layering. I love to layer iconic imagery over a pattern. In this case, I am making art that is a two layer stencil of a deer over a pattern. Sort of a city-meets-country feel to it!

I started by painting my board a neutral color.

I then mixed a little grey paint with the base color to slightly darken it for my pattern layer. I stenciled my quatrefoil pattern on top of the solid painted board. This stencil is designed to repeat like wallpaper so I moved it around to fill the board with the pattern.

Once dry, it was time for the silhouette layer of the Antlered Deer. I love this guy, he’s so confident. Anyway, I wanted to use some pop colors – bright yellow as the base. It took three coats to cover the pattern.

Once dry, I stenciled the deer detail layer in a deep blue. For detailed stencils, always go light with your paint, stenciling is a dry brush technique. I can’t say that enough.

And there you have your modern piece of art.


Sometimes stenciling doesn’t have to mean re-creating a perfect image from the cut design. Using watercolors and layering can produce some interesting results, rich with depth.
I first brushed with watercolor paper with some watery blue colors for my sky. Then, I stenciled using my small evergreen tree design, first in mid tone green. Then once it dried, I stenciled over it with less watery paint in a darker color.
Bob Ross, eat your heart out!


The Folk Art crackle medium for me, is like finding the holy grail. I just love an aged finish. I find such inspiration in urban landscape and decay and with this stuff, I can re-create that worn, weathered look.
Here’s how I did it – First, I painted a wood board dark brown and let it dry. Then I coated the brown painted board with the crackle medium and let that dry. Next,  I painted over the board again with a light cream color.

Immediately, I saw the paint bubbling and spreading apart.

I LOVE the results and decided my typewriter stencil would be appropriate for this worn looking surface. I stenciled the typewriter design in a very dark blue, nearly black paint.

I then found a nice home for it on my shelves with my books!

I love to paint on surfaces that already have wonderful texture and a beautiful finish. Grasscloth is one of those surfaces. It’s natural, beautiful, and affordable. I cut some small squares of the cloth and using a few folk art paint colors I love, I stenciled these birds and bees stencil designs. These could be framed and made into wall art or varnished and used as coasters.

This project is the utmost in up-cycling. Using a discarded item to make a beautiful gift, I’m all about that! So, I went to the dog park the other morning with my best friend Larry, shown here obsessing on a tennis ball. There I found a discarded empty bottle of cheap brandy in the bushes and that is the bottle I will use to show you how to etch a design on to it. Don’t worry, I took it home in a bag and boiled it!

Wrapping a stencil around a bottle is not so easy and etching creme is thinner than paint so it seeps a lit under a stencil unless of course you are using these new adhesive silk-screen stencils by Martha Stewart. Yes, Martha and the people at Plaid have created yet again a fool-proof tool so you can be creative and not worry about messing up! These silkscreens are really easy to use and lots of tasteful designs to choose from.  Here’s what I did.

First, I peeled the silkscreen off of it’s backing and placed it where I wanted the design to appear on the bottle. The back is sticky, re-positionable, and reusable.

Here’s a better shot so you see it really is a screen. This helps control your paint or in this case etching cream.

Then with protective gloves on,  I brushed a generous amount of the cream onto the open areas of the stencil. Go in a few directions so you don’t see brush strokes.

After 15 minutes, I rinsed the bottle with the screen still attached in the sink.  I peeled the screen off at this time and washed the bottle, the brush, and the screen/stencil.

I dried off the bottle and that’s when you can really see your etched design!

To finish it off, I carved an old champagne cork for the top and tied some twine around the neck to give it a vintage look.

It was so gratifying, I went hunting for more glass bottles! Hope this inspires you and please show me what you make!