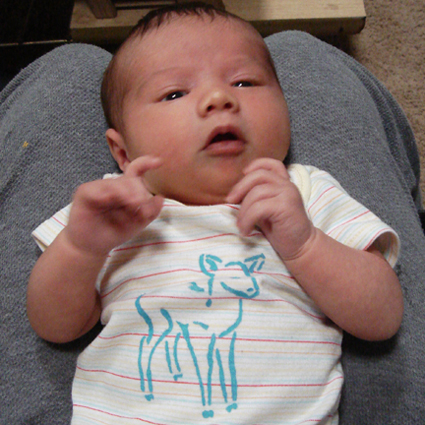
So rather than watch tv last nite, I went to my studio for a few hours to make some prints. Earlier in the day I purchased some archival sheets of paper that are about 18″x24″, about $1.90 each.  If you want to make some art for your walls rather than stencil your walls, this is a fun project. To do prints like this, you will need stencils, ink sprays, a stencil brush, cardboard, and scrap paper.

So I laid out a canvas tarp to catch any overspray and piece of cardboard to allow the paper to lay flat. I knew I would mostly be using my Stencil1 Sprays to make the print. These are fabric inks that are acid-free and archival. They are also non-aerosol! I had two very different concepts, one being a colorful explosion of stencils and the other more of an anti-war poster. What can I say, I’m a Gemini.

Stencil1 print

Archival print by Ed Roth of Stencil1

Archival Print by Stencil1

Archival print by Ed Roth of Stencil1

It’s a quick and easy process. I basically placed my stencils where I wanted them, masked out the areas outside the stencil so my overspray would paint my paper, I used scrap paper, and then sprayed lightly into the stencil area. When done with one stencil area, I carefully lifted the stencil up, still keeping it level with the surface so no excess paint on the stencil surface would drip onto my print. To get the excess paint off the stencil you can place a piece of paper on top of the stencil to soak up that excess paint, and in doing so you are also making a reverse print on that paper! That’s a tip from my gal pal Elaine.

As for the lettering in the banner in the war print, I did use a stencil brush and our Old English Stencil letters. What’s nice about doing lettering with the stencils is the mylar we use is semi transparent so you can see exactly where you want to align your type.

I proceeded to place stencils where I thought they would look nice, choose different colors, and continued this way. Creating your own composition is the fun part! Symmetrical or not, color choices, placement, it all comes from you.

So If you decide to make some poster prints using our stencils, please send us images and we wil post to the blog! Thanks!


A little Stencil Sprayers, Birdie stencil and a canvas...

A little Stencil1 Sprayers, the Birdies Stencil & a square canvas…
Back and fresh from a three day week-end, which I spent stenciling! Of course! Here is a cute little 5 inch square canvas, that I covered with Stencil 1 sprays. On a gessoed canvas, the sprays don’t soak in right away, so you can play around with dropping other colors into it and watch them spread around. I let the canvas sit overnight and then next day added the stenciling, using black acrylic paint. To get the diamond shapes, I stenciled through the perforation from the bird stencil;


Well, I’m having a hum drum kind of day..trying to decide which project to work on, not really feeling like working on any..boo hoo. So from the archives of my hard drive…a shirt I did when I first got my Stencil 1 stencils.

This was a plain white t from the thrift shop..added some of the mini images, like the chimp, the turntable, the awesome Ranchero! Sprayed with the Stencil 1 sprayers in a host of different colors..nice thing, too, the colors don’t bleed into each other. So, you can spray all of these layers..and then heat set the whole shirt.

Here’s a close-up of the layers;

Want to see a Video of the making of a shirt, a gift card and the all important canvas bag sprayed with the Stencil 1 Sprays? Here Ed and I put a nice little gift together: Watch Video Here


Stencil1 has come full circle, we are proud to announce our first book with Chronicle Books!
Stencil101: Make Your Mark with 25 Reusable Stencils and Step-by-Step Instructions comes out in October and will include, you guessed it, 25 stencils and 9 how-to projects including how to stencil a cake and how to stencil windows. PRE-ORDER NOW CHRONICLE BOOKS>